
You don’t need an enterprise cluster in order to get an impression of VMware Tanzu and Kubernetes. Thanks to the Tanzu Community Edition (TCE), now anyone can try it out for themselves – for free. The functionality offered is not limited in comparison to commercial Tanzu versions. The only thing you don’t get with TCE is professional support from VMware. Support is provided by the community via forums, Slack groups or Github. This is perfectly sufficient for a PoC cluster or the CKA exam training.
Deployment is pretty fast and after a couple of minutes you will have a functional Tanzu cluster.

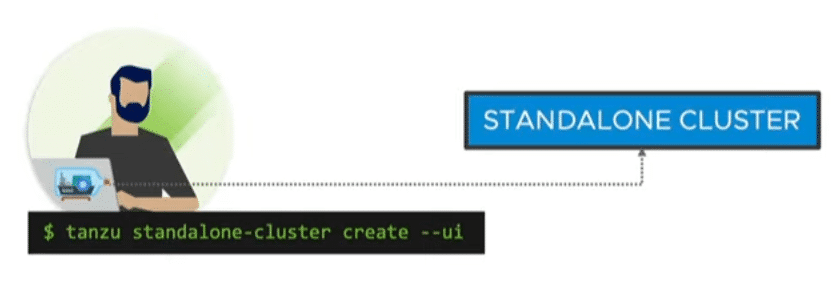
TCE Architecture
The TCE can be deployed in two variants either as a standalone cluster or as a managed cluster.
Standalone Cluster
A fast and resource-efficient way of deployment without a management cluster. Ideal for small tests and demos. The standalone cluster offers no lifecycle management. Instead, it has a small footprint and can also be used on small environments.
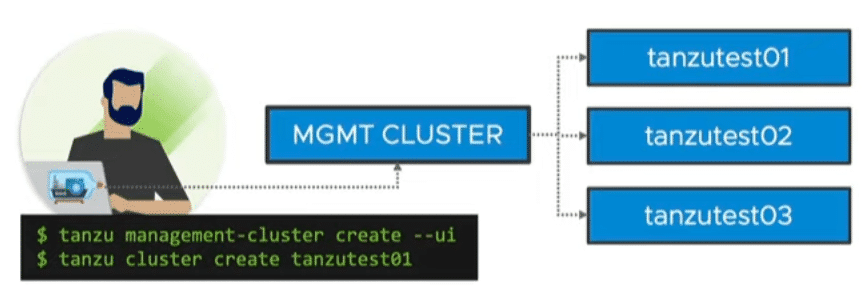
Managed Cluster
Like commercial Tanzu versions, there is a management cluster and 1 to n workload clusters. It comes with lifecycle management and cluster API. Thus, declarative configuration files can be used to define your Kubernetes cluster. For example, the number of nodes in the management cluster, the number of worker nodes, the version of the Ubuntu image or the Kubernetes version. Cluster API ensures compliance with the declaration. For example, if a worker node fails, it will be replaced automatically.
By using multiple nodes, the managed cluster of course also requires considerably more resources.
Deployment options
TCE can be deployed either locally on a workstation by using Docker, in your own lab/datacenter on vSphere, or in the cloud on Azure or aws.
I have a licensed Tanzu with vSAN and NSX-T integration up and running in my lab. So TCE on vSphere would not really make sense here. Cloud resources on aws or Azure are expensive. Therefore, I would like to describe the smallest possible and most economical deployment of a standalone cluster using Docker. To do so, I will use a VM on VMware workstation. Alternatively, a VMware player or any other kind of hypervisor can be used.
Fast track for beginners
VM specs
We need either Windows, Mac or Linux as the guest system. I will use an Ubuntu 20.04 LTS in the following section.
- Ubuntu 20.04 LTS or later
- 4 CPU
- 6 GB RAM
- 40 GB Disk (Minimum 15 GB, with thin provisioning only used datastore will be consumed)
- Internet uplink
- Ubuntu packages patched
Basic setup and requirements
First, we check if the Docker and curl packages are present in our Linux distribution.
dpkg -l | grep docker
dpkg -l | grep curl
My installation did not include curl, which surprised me. We will install Docker after that. Depending on the distribution, there are detailed Docker installation instructions. This is the quick walkthrough for TCE with Docker on Ubuntu.
Setup curl
sudo apt install curl
Setup Docker
First, it is necessary to install the Docker public key.
curl -fsSLhttps://download.docker.com/linux/ubuntu/gpg | sudo gpg --dearmor -o/usr/share/keyrings/docker-archive-keyring.gpg
We change the Docker repository selection to stable.
echo \
"deb [arch=$(dpkg --print-architecture) signed-by=/usr/share/keyrings/docker-archive-keyring.gpg] https://download.docker.com/linux/ubuntu \
$(lsb_release -cs) stable" | sudo tee /etc/apt/sources.list.d/docker.list > /dev/null
Now let’s first update the sources and install Docker.
sudo apt-get update
sudo apt-get install docker-ce docker-ce-cli containerd.io
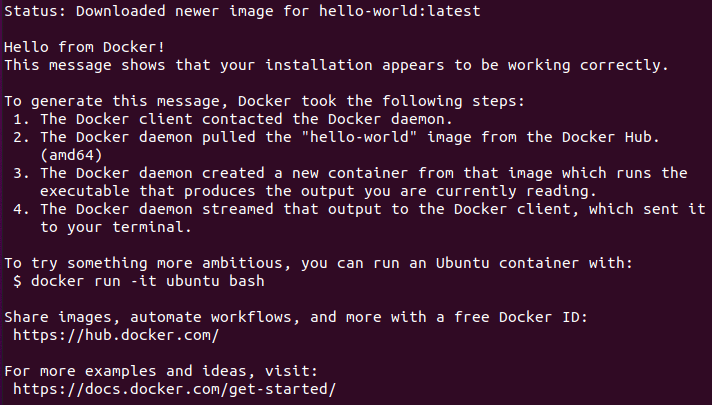
Hello-World
To test whether Docker is working properly, we’ll run a hello-world container.
sudo docker run hello-world
Run docker commands as non-root user
Currently we still have to execute docker commands with sudo. We will change that now.
sudo groupadd docker
Currently, the docker group is created automatically. If this is the case, an error message appears, but that is fine.
In the next step, we add the current user to the docker group.
sudo usermod -aG docker $USER
In order for the settings to take effect, we need to log out of Linux once and login again.
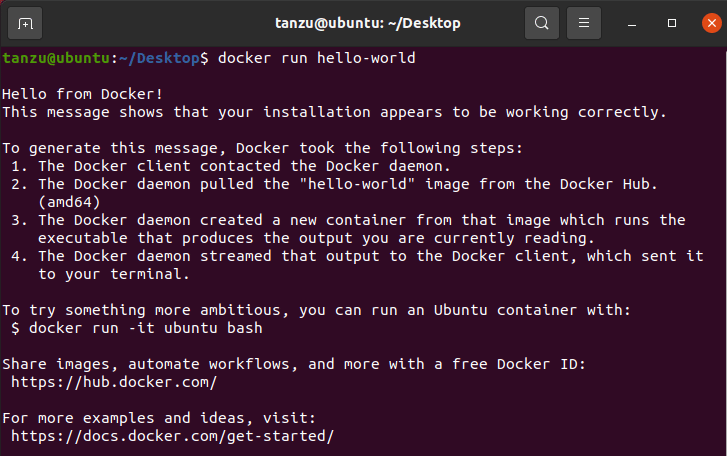
We now run the same hello-world container again without sudo.
docker run hello-world
Start docker service at system boot
sudo systemctl enable docker.service
sudo systemctl enable containerd.service
Setup kubectl CLI
In order to use kubectl commands, we need to download and install the latest client.
curl -LO "https://dl.k8s.io/release/$(curl -L -s https://dl.k8s.io/release/stable.txt)/bin/linux/amd64/kubectl"
sudo install -o root -g root -m 0755 kubectl /usr/local/bin/kubectl
Let’s test with a simple kubectl command.
kubectl version --client
Check cgroup version
We need to make sure that the Linux distribution we are using works with cgroups v1.
docker info | grep -i cgroup

All is fine. If V2 appears here, the kernel parameter systemd.unified_cgroup_hierarchy=0 must be adjusted. Details about this can be found in the CLI documentation (step 2).
Homebrew
For simplified installation of the Tanzu Communty Edition the Homebrew packet manager is recommended.
/bin/bash -c "$(curl -fsSL https://raw.githubusercontent.com/Homebrew/install/HEAD/install.sh)"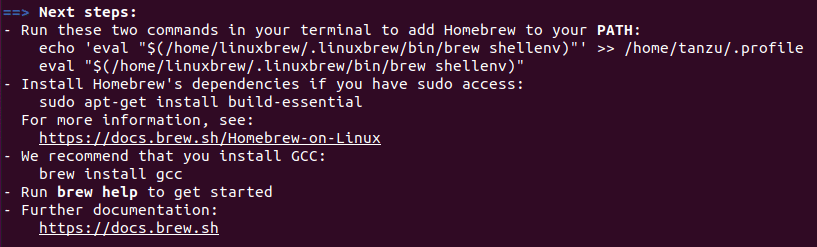
After installation we add Homebrew to the PATH and proceed to install the GNU compiler collection (gcc).
echo 'eval "$(/home/linuxbrew/.linuxbrew/bin/brew shellenv)"' >> /home/tanzu/.profile

eval "$(/home/linuxbrew/.linuxbrew/bin/brew shellenv)"
Install homebrew dependencies.
sudo apt-get install build-essential
Install GNU compiler collection with homebrew.
brew install gcc
Now we are set for the installation of the Tanzu Communty Edition.
Setup TCE
brew install vmware-tanzu/tanzu/tanzu-community-edition
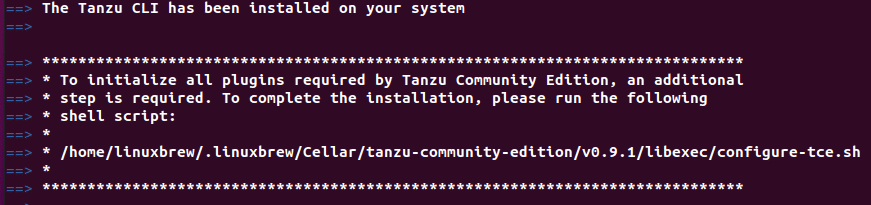
A post installation script is also required. The path depends on the respective installation and can be taken directly from the terminal output (see above).
/home/linuxbrew/.linuxbrew/Cellar/tanzu-community-edition/v0.9.1/libexec/configure-tce.sh

Standalone Cluster setup
We have prepared our VM and installed the Tanzu Community Edition. Now it is time to deploy the cluster. But before that, we should kill all Docker processes and clean up our Docker environment.
docker kill $(docker ps -q)
If no Docker process was present, an error message will be thrown. This is fine.
docker system prune -a --volumes
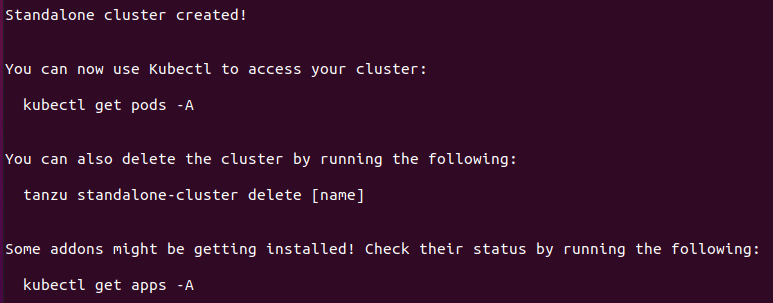
Now we create the standalone cluster. The cluster name must not end with a digit and must comply with the DNS host name convention (RFC 952 and RFC 1123).
I will name my cluster mlx-tce-cluster. So the command to create it will be:
tanzu standalone-cluster create -i docker mlx-tce-cluster
In order to communicate with the cluster, we need to change our kubectl context. Between the cluster name and the user admin is only a hyphen with no spaces.
kubectl config use-context CLUSTERNAME-admin@CLUSTERNAME
kubectl config use-context mlx-tce-cluster-admin@mlx-tce-cluster

We’ll now take a look under the hood and see what has been generated there.
kubectl get pods -A

A number of pods have been deployed here. Now everything is ready for use.
Notice! The cluster will not survive a reboot of the host system. If the host is rebooted, the cluster also needs to be recreated. This is subject to change in a future release.
Setup Package Repository
Tanzu packages enhance the functionality of the cluster and are easy to install.
We create the package repository in the default namespace tanzu-package-repo-global.
tanzu package repository add tce-repo --url projects.registry.vmware.com/tce/main:0.9.1 --namespace tanzu-package-repo-global
After installation of the package repository we can show it.
tanzu package repository list --namespace tanzu-package-repo-global

This looks good. So let’s take a look at what packages are available.
tanzu package available list

Deploy a package
We will install the cert-manager package here. At first we look at the available builds of the package.
tanzu package available list cert-manager.community.tanzu.vmware.com

We’re going to use version 1.5.3.
tanzu package install cert-manager --package-name cert-manager.community.tanzu.vmware.com --version 1.5.3
After setup we can check for installed packages.
tanzu package installed list

Setup Octant dasboard
In order to have something visual as well, we install the Octant dasboard. Homebrew package manager will be helpful again.
brew install octant
We start Octant by entering the command octant on the CLI. A browser window will open pointing to localhost port 7777.
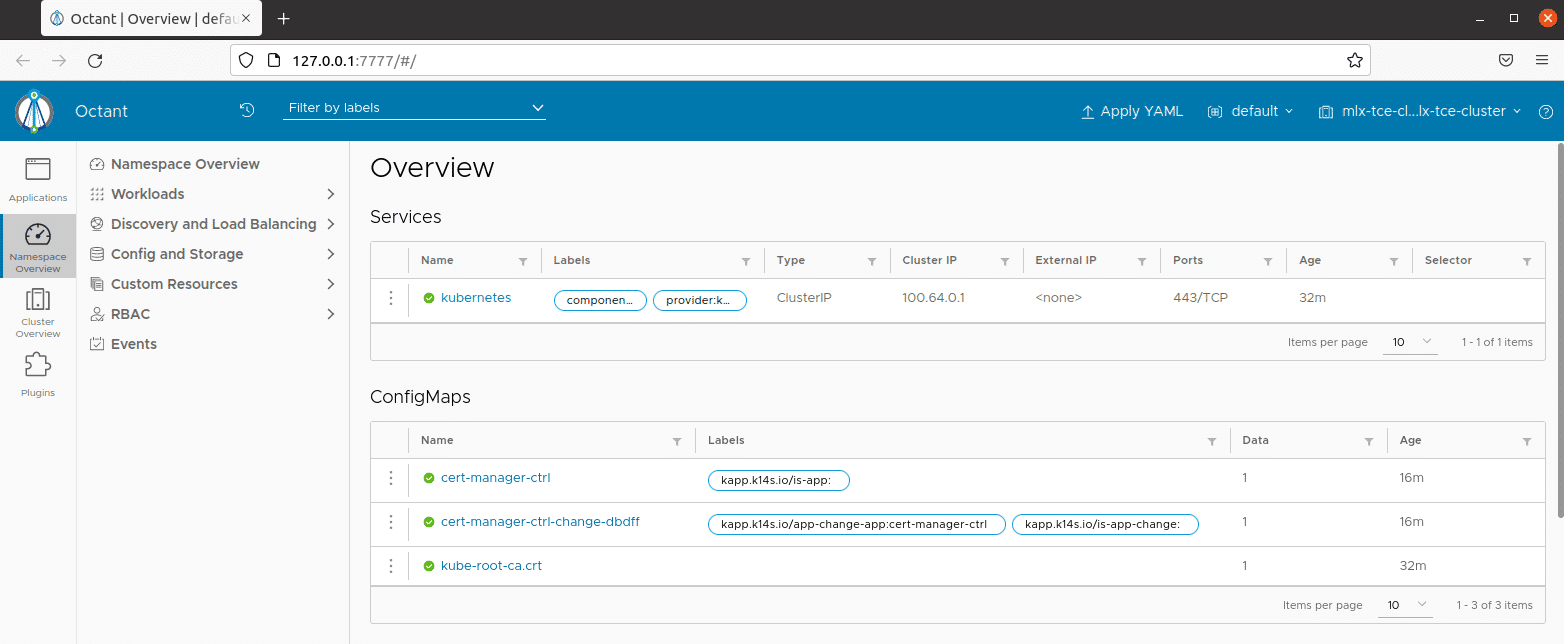
The Octant dasboard graphically displays many cluster parameters that would otherwise have to be queried with kubectl.
This demonstration can now be used as a starting point for your own research.
Conclusion
This post shows how you can create a functional Tanzu Community Edition cluster with limited resources. After this quick tutorial, you should have a running Tanzu system in your hands that allows you to experiment with Tanzu and Kubernetes, launch pods, or configure deployments. Anything more is beyond the scope of this blog article. The TCE documentation is very detailed and distinguishes the different deployment variants and platforms.
Links
- Tanzu Community Edition Documentation
- TCE Download
- Ubuntu Download
- Docker Engine Documentation
- Homebrew
- Kubernetes Documentation
- Octant Documentation
Update December 2022
VMware has put the project to rest, unfortunately. 🙁
On the official homepage you can find the following entry in the FAQ:
Acting on insights gained through community engagement over the past year, VMware has decided to offer a free download of VMware Tanzu Kubernetes Grid in place of VMware Tanzu Community Edition software and to retire the Tanzu Community Edition open source project. Users can download Tanzu Kubernetes Grid here.