Originally, this article was supposed to be called “The role paradox”. On further reflection, I came to the conclusion that this is not a paradox in the true sense of the word. The vCenter is just doing its job.
Authorizations under vSphere are basically simple (as long as we do not want to use restricted authorizations). If we are a member of the administrator group and have unrestricted access to all objects in the data center, privileges and roles are quickly explained.
Definition of terms
A privilege is the smallest unit. It allows the execution of a very specific action.
A role is a collection of privileges. The administrator role contains all available privileges. The no-access role, on the other hand, does not contain any privileges. “No access” is not to be understood here as an explicit denial, but as a lack of privileges. What may initially seem like a semantic quibble is an important difference to other authorization concepts such as Active Directory.
Missing privillege != denial
A permission is always made up of three components: A vSphere object, a role and a user or user group. A user (or a group) can have different roles on different objects. Permissions on objects can be propagated to child objects.
The challenge
Things get interesting when I assign rights globally, but then want to restrict them to certain objects.
Example: The administrators group should have access to all objects, with the exception of some VMs in a defined VM folder. Sounds simple – but it’s not.
I became aware of the problem described here through my colleague Alexei Prozorov, who came across this phenomenon in a customer project. The topic was so interesting that I had to recreate it in the laboratory.
With the release of vSphere 7.0 Update 1, vSphere Cluster Services VMs (vCLS) appeared in vSphere clusters for the first time. This made cluster functions such as Distributed Resource Scheduler (DRS) and others independent of the availability of the vCenter Server Appliance (VCSA) for the first time. The latter still represents a single point of failure in the cluster. By outsourcing the DRS function to the redundant vCLS machines, a higher degree of resilience has been achieved.
Retreat Mode
The vSphere administrator has little influence on the provisioning of these VMs. Occasionally, however, it is necessary to remove these VMs from a datastore if it is to be put into maintenance mode, for example. There is a procedure for setting the cluster to retreat mode. This involves setting temporary advanced settings that lead to the deletion of the vCLS VMs by the cluster.
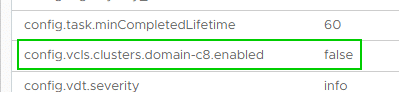
According to the VMware procedure, the Domain ID must be determined to activate Retreat Mode. The domain ID is the numerical value between ‘domain-c’ and the following colon. In the example from my lab, it has the value 8, but the number can also have four digits or more.
The domain ID has to be transferred to the Advanced Settings of the vCenter.
config.vcls.clusters.domain-c8.enabled = false
Correct Retreat Mode settings.
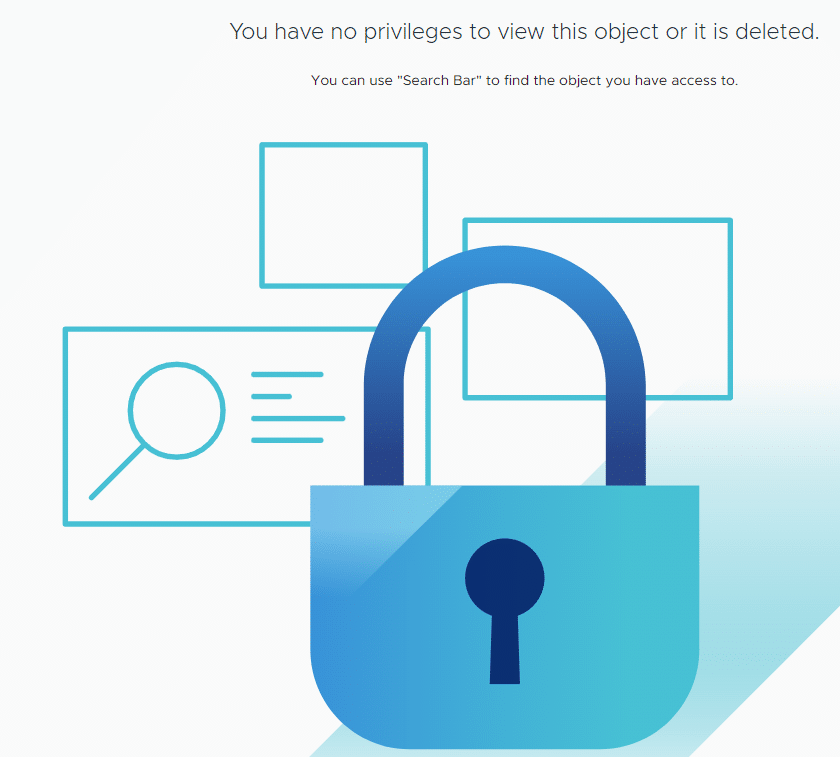
Admin error occured during activation of retreat mode.
After activating retreat mode on a vSAN cluster, administrators had lost all privileges to all objects in the vSphere Client.
A review of the services showed that the vCenter Server Daemon (vpxd) was not running.
In a few days, VMware Explore 2023 EMEA will open its doors in Barcelona at the Fira Gran Via. For all those attending for the first time, this should be a small guide to help you find your way around. I had already published a small survival guide for this in 2018, which is still largely accurate. Even though the event is now being held for the second time with the name VMware Explore instead of the original name VMworld.
From the Airport to the City
There are regular shuttle buses from the airport to the city center. The Aerobus lines T1 and T2 start at Terminal 1 and 2 and both go via Placa Espana to the Placa Catalunya station near the old town. The prices have increased slightly, but are still a cheap and fast way to get to the city center. A return ticket costs €11.65 per person.
If you stay near the Fira, you can also take the L9 metro from the airport to Fira.
Getting to the Fira
The public transport network in Barcelon is well organized. No matter where you live, the nearest metro station is usually no more than 2 blocks away. Trains run very frequently. The destination station is either Europa/Fira, with a 10-minute walk to VMwareExplore, or you can change trains again to Fira station from where it’s just a 5 minute walk.
The public transport company TMB offers a 10-trip ticket. 10 journeys throughout the city for just under €12.
Pro tip: Ask for a Metro Ticket when registering for VMware Explore. The above-mentioned 10-ticket was only issued to participants on request.
Activities beyond VMware Explore
VMware Explore will challenge you physically. Lots of talks, technical deep dives, interesting sessions and, above all, long distances. During the course of the day, you will walk many steps to get from the trade fair (Expo) to the presentations or to lunch. If you still have energy left, you can plunge into the nightlife. There are numerous parties and vBeers all over the city. My friend and vExpert colleague Fred Hofer (vBrain.info) has collected the most important events in his blog post “VMware Explore 2023 Barcelona – Parties and Gatherings“.
Particularly noteworthy is the traditional vBreakfast on Tuesday mornings between 7:00 and 8:30 before the General Session. This is where the part of the community that makes it out of bed so early meets. Even though the event is generously sponsored by Runecast, it has nothing in common with an promotional event. This is a meeting place for bloggers, VMUG leaders or simply people interested in the community. Even if you don’t know anyone yet – you’ll know a lot of interesting people afterwards. Guaranteed!
Community
Aside from the technical content of the presentations, it is of course all about making contacts, networking and maintaining friendships. I didn’t know anyone when I attended VMworld for the first time. To my surprise, I was quickly welcomed by well-connected members. I still count many of these first acquaintances among my circle of friends today and look forward to meeting them again every year.
Dresscode
Rule number 1: leave the office clothes in the wardrobe. Put on comfortable shoes that you can easily walk around in all day.
Nobody expects a jacket and shirt here. On the other hand, T-shirts from a past VMware or VMUG event are always good conversation starters.
Registration
When you register for VMware Explore, you will receive your exhibition badge, which gives you access to the exhibition site and the sponsored evening events.
Registration is open on all days of the fair. If you arrive early, you can pick up your badge on Sunday from 3 pm.
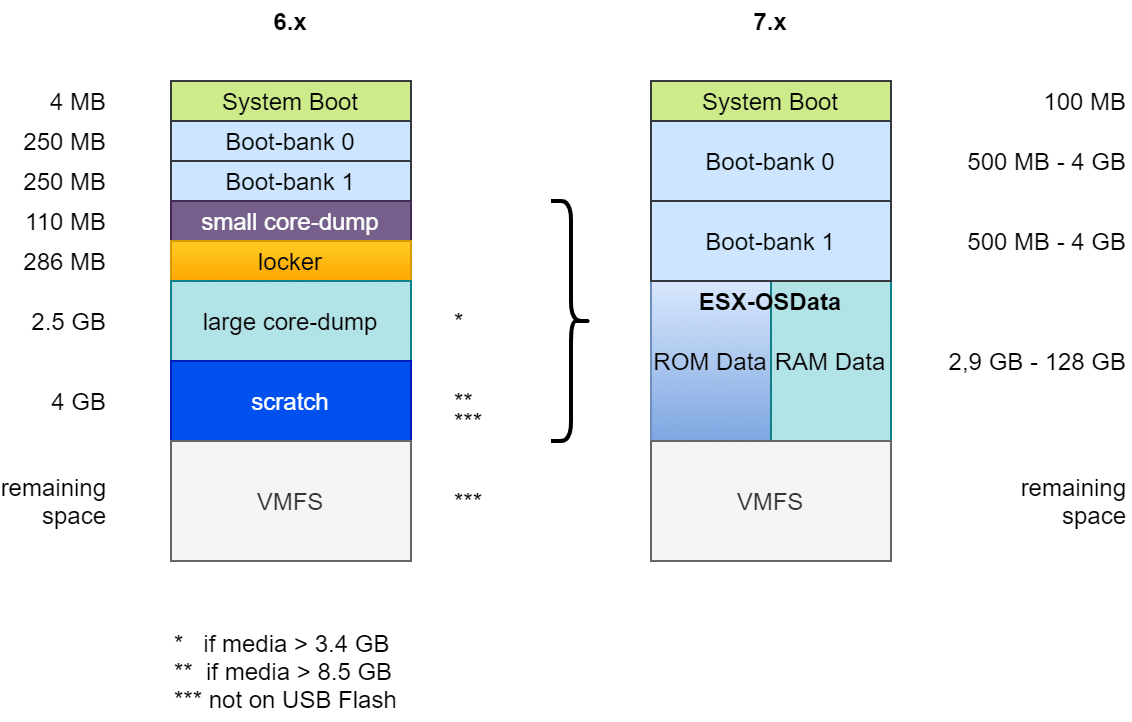
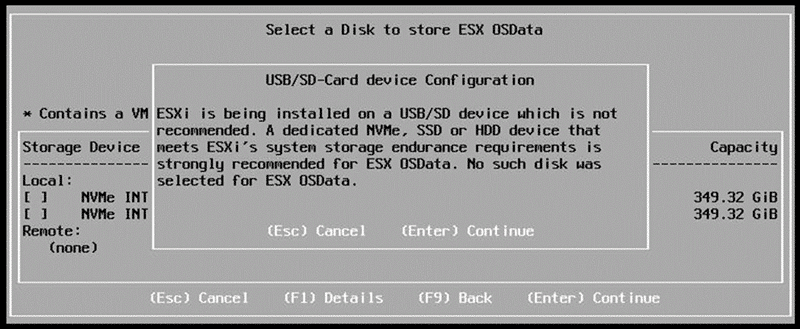
USB boot media did not turn out to be robust enough and were therefore no longer supported from v7U3 onwards. It is still possible to install ESXi on USB media, but the ESX-OSData partition needs to be redirected to permanent storage.
Warning! USB media and SD cards should not be used for production ESXi installations!
Valid setup targets for ESXi deployments
SD cards and USB media are unsuitable as installation targets due to their poor write endurance. Magnetic discs, SSDs and SATA DOMs (disc-on-modules) are still permitted and recommended.
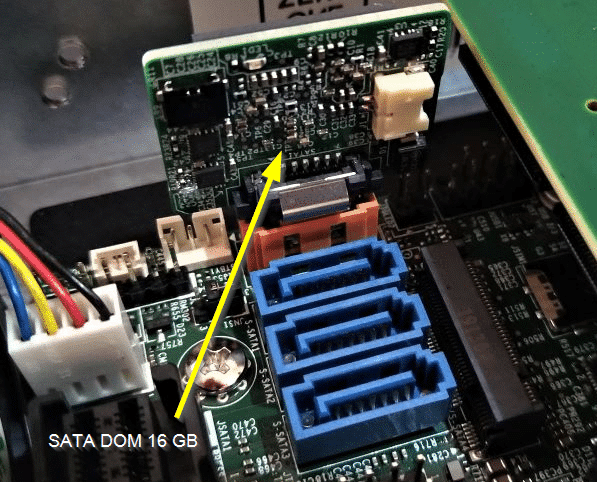
SATA-DOM on a Supermicro E300-9D
New requirements from version ESXi v8 onwards
My Homelab previously used vSAN 7 and thus the classic OSA architecture. To run the cluster under the new vSAN ESA architecture, it was necessary to use vSphere 8 and new storage devices.
I tested the installation and hardware compatibility on a 64 GB USB medium (not recommended and not supported!). During the installation, there were warnings regarding the USB medium as expected. Nevertheless, I was able to successfully test the detection of the NVMe devices and the vCenter deployment.
Setup warning when trying to use an USB flash medium.
Having successfully completed the test phase, I installed ESXi 8U2 on the SATA DOM of my Supermicro E300 server. To my surprise, the setup failed at a very early stage with the message: “disk device does not support OSDATA“.
RTFM
The explaination is simple: “Read the fine manual!”
My 16 GB SATA DOM from Supermicro was simply too small.
For best performance of an ESXi 8.0 installation, use a persistent storage device that is a minimum of 32 GB for boot devices. Upgrading to ESXi 8.0 requires a boot device that is a minimum of 8 GB. When booting from a local disk, SAN or iSCSI LUN, at least a 32 GB disk is required to allow for the creation of system storage volumes, which include a boot partition, boot banks, and a VMFS-L based ESX-OSData volume. The ESX-OSData volume takes on the role of the legacy /scratch partition, locker partition for VMware Tools, and core dump destination.
VMware vSphere product doumentation
In other words: New installations will require a boot medium of at least 32 GB (128 GB recommended) and upgrading from an ESXi v7 version will require at least 8 GB, but the OSData partition of this installation must already be redirected to an alternate storage device.
Dirty Trick?
Needless to say, I tried a dirty trick. I first successfully installed an ESXi 7U3 on the 16 GB SATA DOM and then performed an upgrade installation to v8U2. This attempt also failed, as the OSData area was not redirected in the fresh v7 installation.
I don’t want to install on USB media as I have seen too many cases where these devices have failed. The only option is to invest in a larger SATA DOM.
I opted for the 64 GB model because it is a good compromise between minimum requirements and cost-effectiveness.