
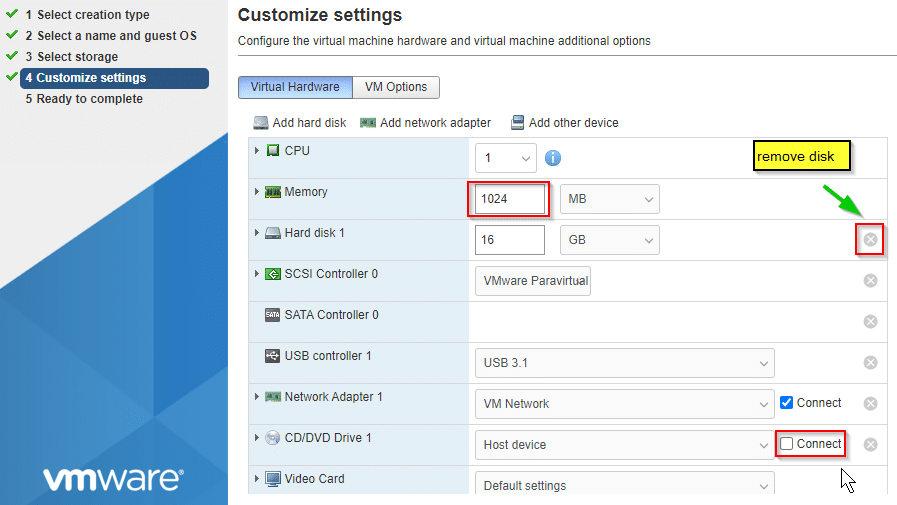
VM customization
Allow SSH login for user root
Working on the console isn’t confortable, but we can’t open a SSH session as user root. Let’s change that first.
cd /etc/ssh
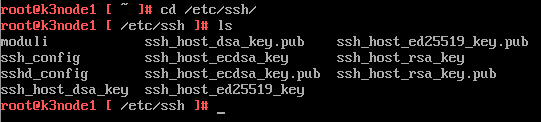
We need to edit sshd_config. The only editor we have is vi (sorry, no nano).
vi sshd_config
Type [i] to enter insert mode. Use the arrow keys to move down to the end of the file. Alternatively you can type [G] first to jump to the end of the file and then enter insert mode by typing [i]. Change Value PermitRootLogin from “no” to “yes”.
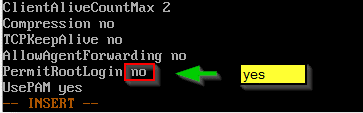
This is not recommended for production environments! But hey, we’re on a totally unsupported platform anyway. 🙂
To save changes type [Esc] + [:] + [wq] + [Enter]
You can check settings with:
cat sshd_conf
You can close the console with exit and open a SSH connection as user root.
Install open-vm-tools
Photon OS has its own little packet manager Tiny Dandified Yum (tdnf).
tdnf install open-vm-tools
root@k3node1 [ ~ ]# tdnf install open-vm-tools
Refreshing metadata for: 'VMware Photon Extras 4.0 (aarch64)'
Refreshing metadata for: 'VMware Photon Linux 4.0 (aarch64)'
Refreshing metadata for: 'VMware Photon Linux 4.0 (aarch64) Updates'
photon-updates 123 100%
Installing:
nss aarch64 3.57-1.ph4 photon 1.64M 1717 059
libxml2-devel aarch64 2.9.10-3.ph4 photon 421.22k 4313 33
xmlsec1 aarch64 1.2.30-3.ph4 photon 1014.40k 103 8744
libxslt aarch64 1.1.34-1.ph4 photon 377.39k 3864 52
libxml2 aarch64 2.9.10-3.ph4 photon 7.30M 7657 112
libtirpc aarch64 1.2.6-1.ph4 photon 193.42k 1980 57
libmspack aarch64 0.10.1alpha-1.ph4 photon 71.69k 734 08
libdnet aarch64 1.11-7.ph4 photon 114.07k 1168 07
fuse aarch64 2.9.9-1.ph4 photon 321.09k 3287 98
open-vm-tools aarch64 11.1.5-4.ph4 photon 2.16M 2268 731
Total installed size: 13.56M 14216501
Is this ok [y/N]:
Confirm with [y].
Downloading:
nss 733496 100%
libxml2-devel 98485 100%
xmlsec1 352774 100%
libxslt 178792 100%
libxml2 1594207 100%
libtirpc 102725 100%
libmspack 47776 100%
libdnet 48576 100%
fuse 120301 100%
open-vm-tools 823199 100%
Testing transaction
Running transaction
Installing/Updating: libxml2-2.9.10-3.ph4.aarch64
Installing/Updating: libxml2-devel-2.9.10-3.ph4.aarch64
Installing/Updating: libxslt-1.1.34-1.ph4.aarch64
Installing/Updating: fuse-2.9.9-1.ph4.aarch64
Installing/Updating: libdnet-1.11-7.ph4.aarch64
Installing/Updating: libmspack-0.10.1alpha-1.ph4.aarch64
Installing/Updating: libtirpc-1.2.6-1.ph4.aarch64
Installing/Updating: nss-3.57-1.ph4.aarch64
Installing/Updating: xmlsec1-1.2.30-3.ph4.aarch64
Installing/Updating: open-vm-tools-11.1.5-4.ph4.aarch64
Created symlink /etc/systemd/system/vmtoolsd.service.requires/vgauthd.service → /usr/lib/systemd/system/vgauthd.service.
Created symlink /etc/systemd/system/multi-user.target.wants/vmtoolsd.service → /usr/lib/systemd/system/vmtoolsd.service.
Complete!
root@k3node1 [ ~ ]#
Bugfix
If you reboot your VM you will most likeliy run into a nasty warning message.
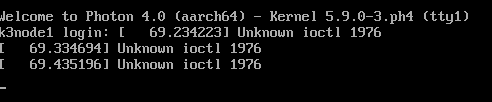
Unknown ioctl 1976
It keeps poping up all the time – at least on the console. Maybe it will be fixed in a future release, but here’s a dirty hack to bypass the problem.
Login to SSH as root.
cd /etc/modprobe.d
touch blacklist.conf
vi blacklist.conf
Add these lines to the empty file:
blacklist vsock_loopback
blacklist vmw_vsock_virtio_transport_common
install vsock_loopback /usr/bin/true
install vmw_vsock_virtio_transport_common /usr/bin/true
Reboot the system and the warning is gone.
Prepare iptables
A firewall is a good idea in production environments but iptables seem to cause a bit of trouble with K3s. I’ve followed William Lam’s advice to deactivate iptables for the project.
systemctl stop iptables
systemctl disable iptables
Now we’re set with our base installation. Of course we can repeat all the steps for each of the two other nodes, but it’s easier to clone the disk. Well, cloning a VM on a standalone ESXi on Arm host isn’t as simple as we know it from vSphere clusters. But it’s not a big deal either. Shut down the VM we’ve just prepared.
Build two new VMs without disk. Same settings as above.
After Youve created VM 2+3 copy the vmdk of the first VM into the datastore folders of VM2 and VM3. You can do this either in the host client of ESXi on Arm or on the SSH shell (activate SSH service on host first).
In the example below I copy vmdk and flatfile to the new location and rename it according to the destination VM name.
cp /vmfs/volumes/pi-Datastore01/k3node-1/k3node-1.vmdk /vmfs/volumes/pi-Datastore01/k3node-2/k3node-2.vmdk
cp /vmfs/volumes/pi-Datastore01/k3node-1/k3node-1-flat.vmdk /vmfs/volumes/pi-Datastore01/k3node-2/k3node-2-flat.vmdk
You need to adjust names for datastore, VM folders and VM disk files to match your environment.
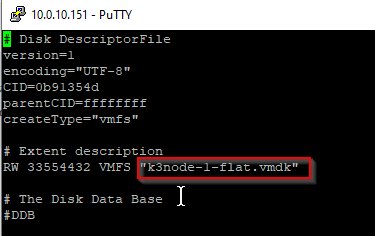
Before we can mount the disk to the VM, we need to adjust the name of the flatfile in the descriptor (vmdk). Example for VM2:
vi /vmfs/volumes/pi-Datastore01/k3node-2/k3node-2.vmdk
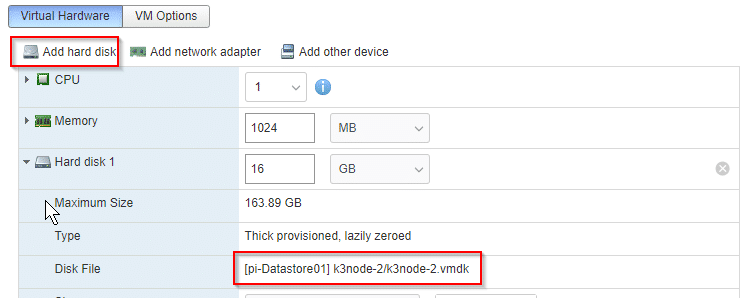
Repeat steps for the third VM. Mount existing disks in the host client to VMs. Add hard disk and point to the local vmdk that we’ve copied and renamed.
Adjust settings in cloned VM
We’re not finished yet. Our second and third VM have identical settings from VM1. That includes host name, IP, etc.
To avoid an IP conflict make sure all VMs are shut down. Boot VM2 to adjust settings. It is better to change settings on the console, because we will change IP settings and would lose connection in an SSH shell.
Change hostname
The hostname is still the one of our original VM because we’ve copied the whole disk file.
vi /etc/hostname
Replace old hostname with the new one.
Change Network settings
Same is true for network settings.
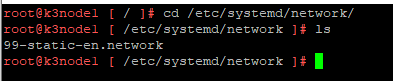
cd /etc/systemd/network
You’ll probably find a file starting with 99-. Like 99-static-en.network.
Edit the file and enter the new IP settings.

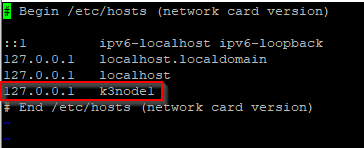
Change hosts entries
It’s importnt that you also change the old hostname in /etc/hosts to new hostname. I forgot to do so and then I had strange problems during K3s cluster join.
Update Machine-ID
This step is important if you’re using DHCP. If you don’t provide a new machine-ID you’ll always get the same IP address. For static network addresses this step is optional but recommended.
echo -n > /etc/machine-id
Finalize preparation
Reboot VM or restart network daemon.
systemctl restart systemd-networkd
Repeat procedure for third node VM.