Backing up and restoring an ESXi host configuration is a standard procedure that can be used when performing maintenance on the host. Not only host name, IP address and passwords are backed up, but also NIC and vSwitch configuration, Object ID and many other properties. Even after a complete reinstallation of a host, it can recover all the properties of the original installation.
Recently I wanted to reformat the bootdisk of a host in my homelab and had to fresh install ESXi for this. The reboot with the clean installation worked fine and the host got a new IP via DHCP.
Now the original configuration was to be restored via PowerCLI. To do this, first put the host into maintenance mode.
The command prompts for a root login and then automatically reboots. At the end of the boot process, an empty DCUI was welcoming me.
I haven’t seen this before. I was able to log in (with the original password), but all network connections were gone. The management network configuration was also not available for selection (grayed out). The host was both blind and deaf.
Recently I activated Tanzu with NSX-T in my homelab. After some hurdles in the planning phase, the configuration worked fine and also north-south routing worked flawlessly. My edge nodes established BGP peering with the physical router and advertised new routes. New segments are immediately available without further configuratiom on the router.
One feature that distinguishes my lab from a production environment is that it doesn’t run 24/7. After the work is done, the whole cluster is shut down and the system is powered off. An idle cluster makes a lot of noise and consumes unnecessary energy.
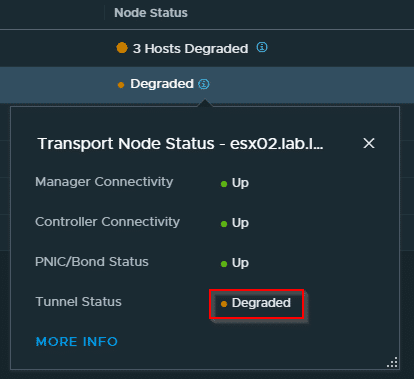
Recently I booted the lab and observed that no communication with the router or DNS server was possible from my NSX segments. A perfect case for troubleshooting.
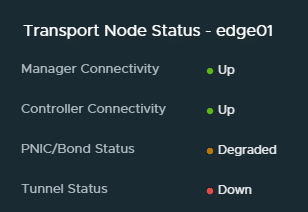
First I checked the Geneve tunnels between the transport nodes. Here everything was fine and every transport node was able to communicate with every other transport node. The root cause was quickly located in the edge nodes. Neither a reboot of the edges nor a vMotion to another host did improve the situation.
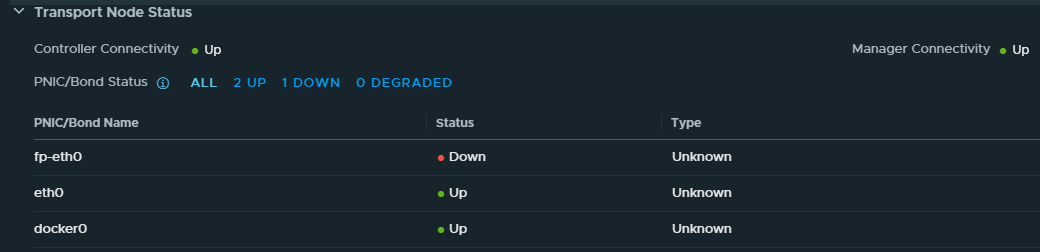
The Edges weren’t completely offline. They were administrable using the management network. Traceroute was working via T1 and T0 service routers up to the fastpath interface fp-eth0. From there, no packets were forwarded.
The interface fp-eth0 is connected to the distributed port group “Edge-Trunk” on vSwitch VDS-NSX. A quick check in the vSphere client showed that the uplink ports of both edges were blocked. Not in the “down” state, but blocked.
At this point, I would ask a customer what he has changed. But I am very sure that I did not make any changes to the system or the configuration. Yes, they all say that 😉
Lab environments are a great thing. We can test new products on a small scale platform and demonstrate them as a proof of concept (PoC).
Like many of my fellow bloggers I write down my lab experience in little blog posts that I share with the community. I regularly read blogs and tutorials to keep myself informed about new products and techniques. There is hardly a topic in the field of virtualization that someone hasn’t written something about at some point. This is invaluable, as it gives you a quick introduction to what is usually a complex subject.
When reading my (and other) blog posts, you may get the impression that the described setup procedure follows the simple skip-skip-finish principle. In other words, accept the default values, click three times and the installation is complete. This might be true in the lab, but a real life deployment is miles away from a lab setup.
In the lab many things are simplified to the max according to the KISS principle (keep it simple and stupid). Some of the methods used are not necessarily in compliance with the manufacturer’s recommendations, or are outright forbidden in productive environments.
This means : Having read a tutorial by my favorite blogger [insert name here] does not enable me to transfer what I have learned 1:1 to a real project.
I have had several discussions about this in preliminary project meetings. People have asked why the planning phase takes so much time. They said that (they thought) the product was totally easy to install, as you can read on [insert name here]’s blog.
As a blogger and lab user, I know how to view these posts. They are to be understood as a quick introduction and an easy to understand overview of a new technology. This has very little to do with real world deployments. In this posting, I would like to point this out with the help of a few examples:
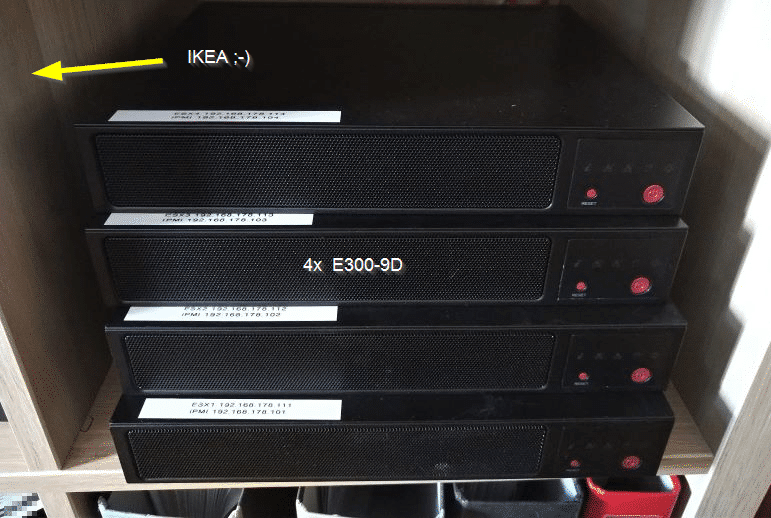
I reported in detail last year about the planning and hardware of my homelab vSAN cluster (part 1 and part 2). For the sake of simplicity, the four small Supermicro E300-9Ds were placed on an ordinary IKEA rack.
Low budget rack, made in Sweden.
This worked quite well for some time, but changes in cabling, or hardware maintenance turned out to be difficult. Disconnecting patch cables and power cords was always a challenge. Restoring the cabling was even more difficult. It was not uncommon to end up with swapped ports after such actions.
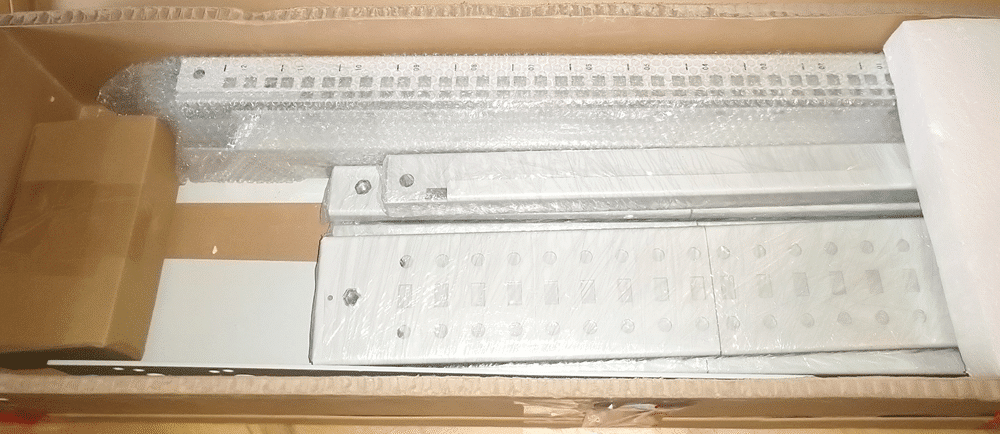
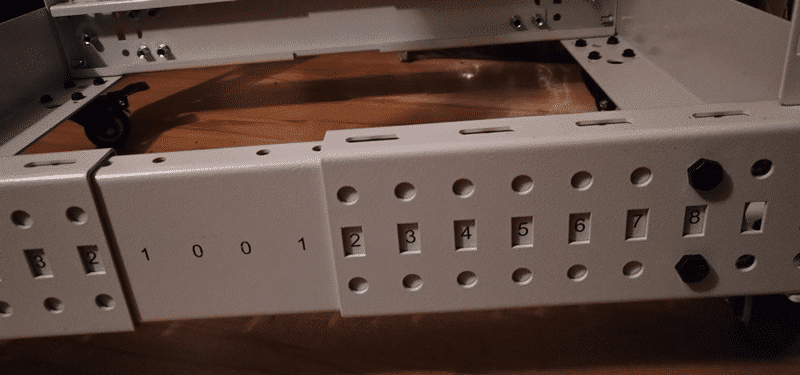
In other words, a solution was needed. A 19″ rack would be ideal, but I don’t have room for a 48 U cabinet in my office. After some research, I found a small rack with 12 U at one of my hardware suppliers, which can also be equipped with rolls. This seemed perfect as it was just about as high as my desk. Also the depth is variable from 57,5cm to 101cm. No problem for the compact E300-9D and a few network components.
Time for Tinkering
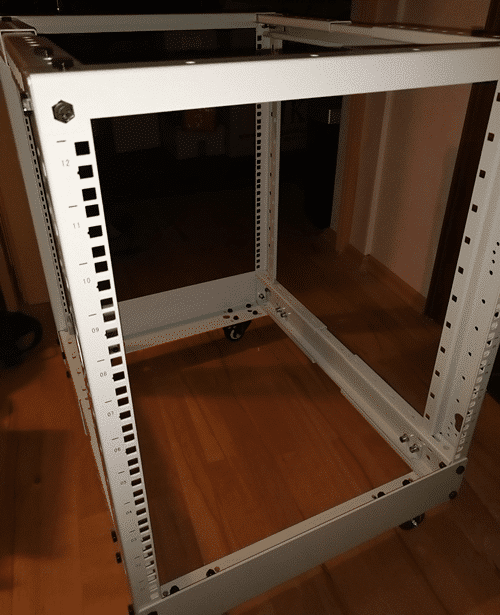
The frame comes in a very compact pack size and turns out to be solid metal design with proper bolting.
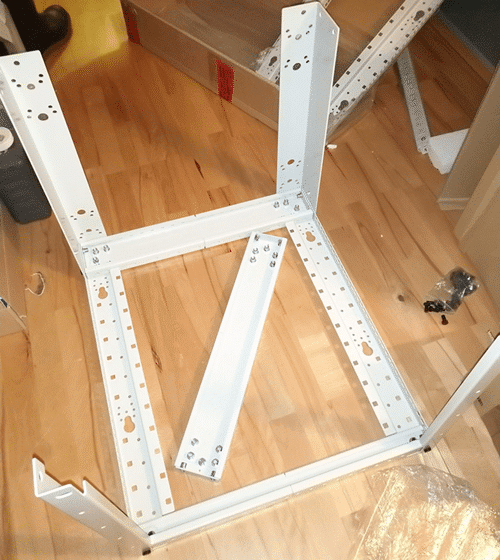
Phase 1. Rack lying on its side.Variable adjustment of the rack depth.Almost done
Refitting Components
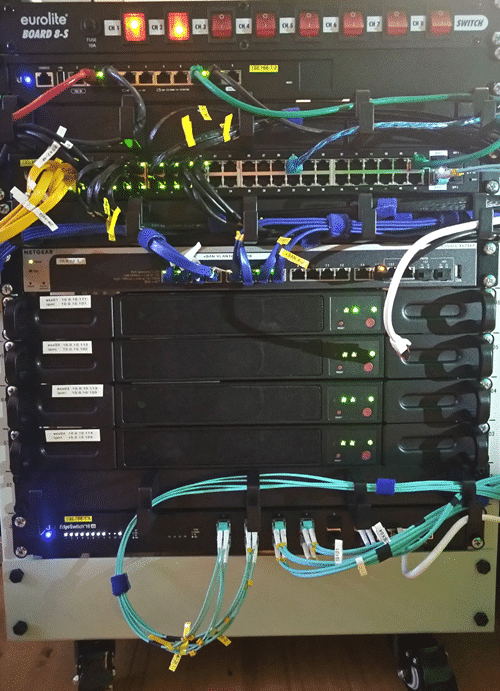
Some of the existing components had to be refitted to 19 inches. For example, the Ubiquiti EdgeRouter 10X, for which a conversion kit is available from the manufacturer (SKU: ER-RMKIT). The same applies to the Supermicro E300-9D mini servers. Supermicro also offers a conversion kit (MCP-290-30002-0B), which extends the servers to 19″ width and includes a bracket for the power supply.
Preliminary expansion
In the early design phase, I didn’t think I would be able to fill all 12 height units. But step by step it became clear that further components were necessary and had to be added. For example, the power switch strip (top), which can be used to switch individual device groups. It is connected to the power distribution strips on the rear. Cable guides are also a must if you don’t want to end up in a mess. It quickly became clear that a separate switch would be needed for the 1 GBit connections if you didn’t want to waste 10 GBit ports for 1 GBit.
Although I am a big fan of the Ubiquiti UniFi system, I decided to use EdgeMax series devices for the Homelab. These can be configured individually on the CLI or the web GUI.
The E300-9D are equipped with a total of four 10 GBit adapters. Two of these are RJ45 and two are SFP+. This led to the upgrade with an Ubiquit EdgeSwitch 16 XG.
There are storage shelves on the back, which can be used for the Raspberry Pi and other accessories. A Raspberry Pi acts as DNS and NTP server in the lab.
Since the whole rack is mounted on rollers, it can be easily pulled out for maintenance. Only one patch cable and one power supply has to be disconnected for this.
Noise emission
As the number of devices increases, so does the noise. I already described how to silence the Netgear 10G switch in an older article. The Ubiquiti switches work surprisingly silent and are only a bit louder during startup. At a distance of one meter, all switches reach a sound pressure of about 20 dB. This corresponds to a flying mosquito. Not too annoying, but audible. The four E300 servers currently have the highest noise level, but the original fans could be replaced with Noctua models as well. Maybe a future project…